|
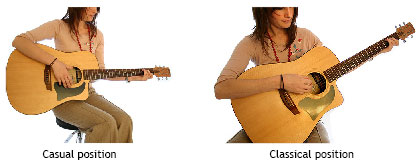
Sitting Positions There are two sitting positions for holding the guitar; classical and casual. 1. Pick up the guitar and make sure that the guitar body is supported by your leg.
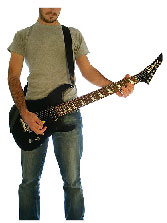
Standing Position 1. Pick up the guitar and place the strap over your shoulder. Adjust the strap so that the guitar is positioned mid-body.
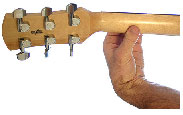
Hand Positions It is important that you relax your wrists and hands. Straining them can cause injury.
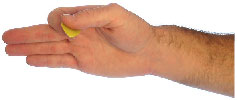
Fretting When you play the guitar, you use your left hand fingers to press down the strings on the fret board of the guitar and use your right hand to pluck or strum the stings at the bridge end of the guitar. Using your left hand to press the strings on the fret board is called fretting. Here are some tips you will need to know: 1. Short fingernails are essential. As a beginner guitarist, it may hurt your fingers to play. This is normal. Every guitarist starts this way for the first couple of weeks. With practice, you will develop guitar fingers (hard skin on your fingertips). Holding the Pick Position the pick between thumb and index fingers like in the diagram below:
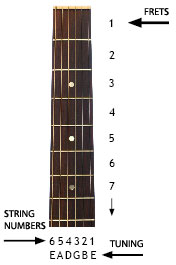
Time to take a break. Well done, you've just completed the first part of this newsletter. Next you are about to learn about chords and by the end of this lesson you'll have learnt the A Major chord. Don't forget, for the ultimate guitar learning kit which includes step-by-step written lessons, video lessons, audio lessons and sophisticated software games, visit Jamorama.com Now you are ready to start your first lesson. Your aim in this lesson is to learn the A and D major chords and to introduce yourself to reading guitar tablature. This lesson is very important, so I want you to really focus. Remember! It is more beneficial for you to practice multiple times during a week than to practice for one long session. This is because your brain processes information in chunks at a time and it can only hold a certain amount in short term storage. For example, with phone numbers, it is very difficult to remember any more than 7 digits at a time. Yet if you give yourself time between practicing, even if it is just 10 minutes, you’ll find that your brain is much more efficient at turning your short term practice into long term knowledge. More information on effective learning is contained in our Jamorama product at Jamorama.com. Ok. That aside, let’s get started on the lesson. To start with, I want you to have a look at the guitar neck diagram below and make note of all the relevant pieces of information.
Note: Each string on the guitar is numbered. When you hold your guitar as you would when using the casual playing position, the 1st string is at the bottom and the 6th string is at the top. Notice also the term, ‘Tuning’ at the bottom of the above diagram. Tuning refers to the notes that the guitar strings are tuned to. In the above diagram, I have given a very common tuning called standard E tuning that consists of the notes E, A, D, G and B. Strings 1 and 6 are both tuned to the note E. The open 6th string is called low E. The open 1st string is called high E as it is two octaves higher than the 6th string open E. I will explain notes and octaves to you in a later newsletter, but for now, you only need to know the names of the notes in standard open E tuning. | ||||||||
Introduction to Chords
Now we are going to look at guitar chords. Guitarists use many different chords to make progressions or riffs that can then be used to create songs. If you are not familiar with some of these terms, it’s ok. We will cover everything that I am talking about in good time.
A chord is defined as a combination of 3 or more notes played together. To examine this, I want to take a look at chord diagrams. Chord diagrams are used to illustrate how a chord is played. They are very easy to use because they look very much like the neck of the guitar, in fact, the Jamorama chord diagram is a guitar neck.
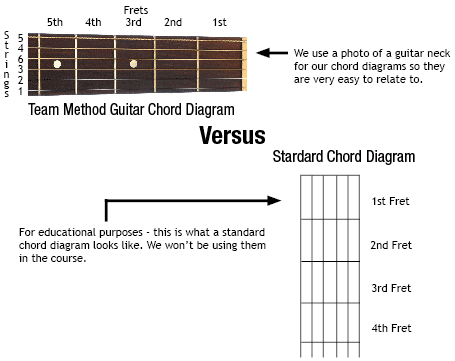
As stated above the Jamorama chord diagrams are going to be pictures of an ‘actual’ guitar neck so it’s easy to make the connection between strings and fingering. There is also a picture of the type of chord diagram that appears in most other Guitar learning guides. I want you to be aware of that form of ‘standard’ chord diagram because you may want to use it when writing up chords on paper at home.
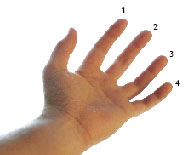
So, now that you know what a chord diagram looks like and how it matches with the neck of your guitar, it’s time to come back to what I said earlier about a chord being a combination of 3 or more notes played together. Finger placing symbols are added to the chord diagram so we know which notes to play. To start with, let’s look at your fingers.
|
We give each playing finger a number that we can then match up on the chord diagram (see below). |
And now, let’s look at a full chord diagram. We will use the example of the A major chord:
Chord Diagram - A Major Chord
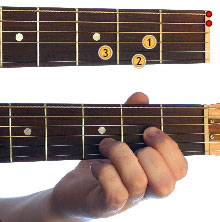
In the chord diagram below you can see that the A major chord uses fingers 1, 2, and 3. Take note of how this chord diagram looks - we will use this style from now on.
|
The A major chord is constructed of the notes A, C# and E. We will cover notes a little later. For now, we will make chords without knowledge of individual notes. |
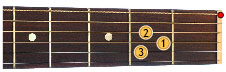
Note that there is a red dot marking the 6th string on the above chord diagram. The red dot tells you that you are not to play that string. The sixth string of the A major chord is not played, but you play the rest.
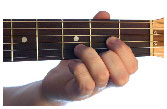
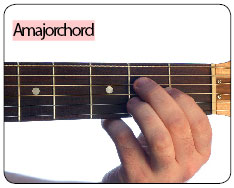
Throughout this newsletter series, every chord diagram will be accompanied by a picture of the chord being held on the fret board and video and audio of the chord being played for you to check with. Pictured below is the A major chord being played.
Exercise: Playing the A Major Chord
Position each finger with care, according to the above diagram. Make sure that each fingertip is placed directly behind the fret. Firstly, pluck across the strings one by one with your right hand, checking that each string rings clearly and is not muted or buzzing. Play the first Audio or video example to hear how the chord should sound.
Now that we’ve looked at chord diagrams, I want to move on to strumming.
Introduction to Strumming
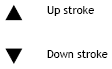
In a strum there are two types of guitar stroke. They are up stroke and down stroke. Throughout this book these strokes will be notated as follows:
When you play a stroke, you strum across the strings just in front of the bridge of the guitar with the pick in your left hand. When strumming a chord, make sure that you play all of the necessary strings in the chord. The stroke direction will depend on which stroke is indicated; up or down as shown above.
Exercise: Strumming the A Major Chord
Position each finger with care, according to the A Major chord diagram (above). Make sure that each fingertip is placed directly behind the fret. Firstly, pluck across the strings one by one with your right hand, checking that each string rings clearly and is not muted or buzzing. Once you are sure that you are holding the A major chord correctly, practice strumming the chord in single downward strokes as indicated below:
![]()
While you play this, see if you can say out loud an even 4 count. Another option if you are a Jamorama.com member is to use the jamorama metronome - it will help you to stay in time.
Try your best to start your strum from the fifth string each time you strum. A major, doesn’t sound bad if you accidentally hit the top string, although if you want your music to sound professional, you’ll want to play this chord properly. Remember to stay relaxed. Your fingers may hurt a little but they will get stronger.
Now that you are playing the A major chord properly, let’s take a look at strumming another chord...
The D Major Chord
The D Major Chord is constructed of the notes D, F# (F sharp) and A and is played using fingers 1, 2 and 3:
As with the A major chord: try strumming the D major chord in downward strokes with your right hand.
Note: The top two, or fifth and sixth, strings are not played in the D major chord. Make sure that you start your stroke from the third string each time you strum D major, it doesn’t sound bad if you accidentally hit the fifth string, although as with A major above, if you want your music to sound professional, you need to play this chord properly.
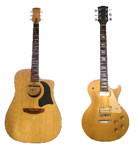
Hints for Buying a New Guitar
Often you can find online auctions where guitars sell for incredibly low prices; however, I wouldn’t advise you to take this option. As a rule you should always play before you buy so that you get a chance to gauge performance. Once you’ve got the background knowledge that you need on the guitar of your choice the next task is to set yourself a budget and stick to it. Don’t let salespeople talk you into spending more money than you anticipated. Testing out new guitars in the shop can be an intimidating task for beginners. It is important to remember that you are not there to showcase your playing ability – you are there to discern whether your proposed buy is a good deal or not. Check the frets for buzzing by playing each one. Make sure that the neck is not warped by looking down it as if you were sighting a gun. Check that all of the volume and tone switches etc. are in good working condition. It is a great idea to take an experienced guitarist along with you when you are looking at a possible purchase, so see if you can persuade a teacher of friend. Not only will they be able to offer helpful advice – they will be good moral support when it’s time to pick up the guitar and test it out in public. |
 You really need to arm yourself well before you try haggling with your local guitar salesman.