|
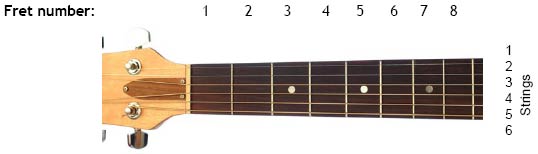
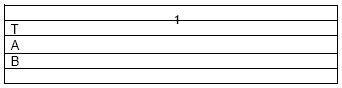
TAB or tablature is the most common method of writing out music for the guitar. It is different from classical music notation in that; TAB uses ordinary numbers and keyboard characters as opposed to standard musical notation which uses symbols. Because of this format, anyone with a computer can write or read TAB making it the most user friendly way to read and communicate guitar music. Also TAB relates directly to the fret board of your guitar meaning that you may easily see where you put your fingers. In the full version of Jamorama, both standard musical notation and tablature are used. But for this six day course we will only use TAB. The reason for this is that tablature is very easy to read and you should have no problems learning TAB in a few short minutes of reading. TAB has some weak points, the worst of which is that rhythm can't be easily indicated. This shouldn't pose a problem though, as I will indicate the rhythm for each exercise using the strum indicators that were introduced in lesson one. OK. To start I want you to look at your guitar and you will clearly see that it has six strings going from thickest to thinniest. On a TAB diagram, the thinnest string, (or 1st string as its most commonly called) is at the top - The thickest (or 6th string) is at the bottom. This is clearly demonstrated in the 1st example below. The following diagram shows you how tablature relates to the guitar fret board:
Some of you may notice that this guitar seems upside down in relation to how you play. This is simply the way that guitar music is generally written. Now if you transfer this same model to a written format you will get TAB, which can be seen below.
So the lines above indicate the strings on a guitar. The top line of the TAB being the thinnest string of the guitar, and the bottom line on the TAB chart indicating the thickest string of the guitar. Now if you look at your guitar you will see metal bars that raise up from the neck of the guitar called frets. TAB uses numbers to show you which one of these frets to press down and play.
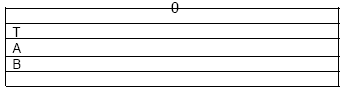
So if you were to play the above piece of TAB on your guitar, you would pick the thinnest string once with your plucking hand and do nothing with your fret hand. Now let's see if we can start pushing down some strings. Look at the next example below and try and play the note that the TAB chart displays.
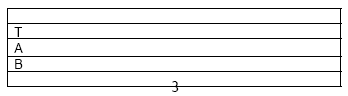
If you pressed down the thickest string at the 3rd fret then you played the exercise correctly. If you are still unsure whether you are doing the right thing or not, refer to the video below. Let's try another one. Play the following piece of TAB:
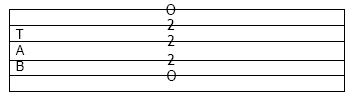
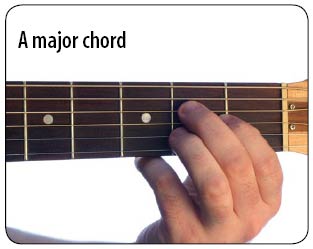
This TAB diagram above indicates the 2nd string (second thinnest) and you should be pressing down on the first fret. Things become a little more complicated when you are required to play chords, however the basic principals I have already outlined still apply. The only difference is that you will be required to play more strings and hold down more strings with your fingers. In this next example I will show you how to play the chord ‘A’. A Major Chord
The first and fifth strings are played open while the second, third and forth strings are played at the second fret. The sixth string is not played in the A Major Chord and this is indicated by an X. If you have read the TAB correctly your fingers should look like this:
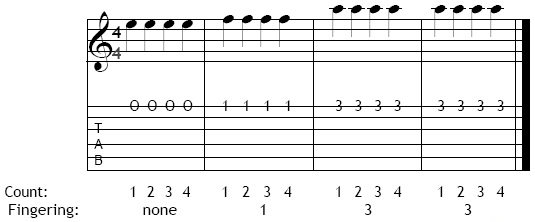
So now you know how to use basic tablature as it applies to notes and full chords. In this introductory set of lessons you will use TAB to learn different chords and by lesson six you will be able to play the full song, 'Rivers of Babylon'. Time to take a break. Well done, you've just completed the first part of this newsletter. Next you are about to learn about notes on the first string. Don't forget, for the ultimate guitar learning kit which includes step-by-step written lessons, video lessons, audio lessons and sophisticated software games, visit Jamorama.com Notes on the First String Knowledge of the notes that are on each string is necessary for understanding guitar theory. The first string is also known as the high E string. The main notes in the first position on the first string are E (open), F (1st fret) and G (3rd fret). The first position refers to the first 4 frets of the guitar.
We will use these notes in the following exercise to introduce to you the concept of note picking. Exercise:
We will leave it there today in terms of guitar theory. Next time I want to get you strumming a whole lot more, but right now I want to look at something else and that is how to get a 'that' sound. Getting ‘That’ sound – blues/rock guitar solo aka Jimi Hendrix. |
Free Guitar Lessons
Free Guitar Lessons
From :
GregX
Josip Peut
Paul Tauterouff
Guitar Courses
Useful Guitar Resources
Guitar Articles
Beginner Guitar Lesson Online
Beginner Guitar Lesson
Bluegrass Guitar Lessons
Bluegrass Guitar
Classical Acoustic Guitar
Classical Guitar
Flamenco Guitar And Strings - Advice for Beginners
Flamenco Guitar
Guitar Chord Progressions - Where Do They Come From?
Chord Progressions
Guitar Chords: Open Chord Progressions In The Key Of E
Guitar Chords
Guitar Effects: Pedals vs. Rackmount Processors
Guitar Effects
Guitar Lesson: Why So Much Advice On Guitar Playing?
Guitar Lesson
Guitar Lesson Online
Online Guitar Lessons
Do You Love The Blues?
Blues
5 Ways to Be a Well Behaved Lead Guitarist
Lead Guitarist
Learning to Play the Guitar
Play the Guitar
Online Guitar Lessons - Learn To Play Guitar The Right Way
Guitar Lessons
Online Guitar Lessons: Easy Technique To Learn Guitar
Guitar Lessons Online
Playing The Blues
Blues Guitar
Playing Guitar - A Reflection Of Your Soul
Playing Guitar
The Importance of Regular Guitar Practice
Regular Guitar Practice
How To Have Productive Rehearsals
Guitar Rehearsals
20 Tips For Better Phrasing
Tips for Phrasing